Usage
ipyflex is meant to be used with widgets based on ipywidgets. The entry point of ipyflex is the FlexLayout class, it allows users to dynamically customize the layout and fill their dashboard from the existing widgets.
Create a dashboard from existing widgets
The simplest way to create an ipyflex dashboard is to create a dictionary of existing widgets with the keys are the names of the widget and values are the instances of widgets and then use FlexLayout to compose the layout.
from ipyflex import FlexLayout
import ipywidgets as ipw
widgets = { 'Widget 1': ipw.HTML('<h1> Widget 1</h1>'),
            'Widget 2': ipw.HTML('<h1> Widget 2</h1>'),
            'Widget 3': ipw.HTML('<h1> Widget 3</h1>'),
            'Widget 4': ipw.HTML('<h1> Widget 4</h1>')
        }
dashboard = FlexLayout(widgets)
dashboard
Advanced configuration
Users can pass some configurations to the constructor of FlexLayout to set the template or the style of the dashboard:
dashboard = FlexLayout(widgets,
    template = 'saved.json',
    style = {'height': '50vh', 'borderTop': '5px'},
    header= True,
    layout_config = {'borderLeft': False, 'borderRight': False, 'enableSection': False},
    editable = False)
template: the path to save template file, this file can be generated from the dashboard interface.
style: CSS styles to be passed to the root element of the dashboard, it accepts any CSS rules but the keys need to be in camelCase format.
header: set to True to activate the default header, pass a dictionary to create a configurable header.
layout_config: dashboard layout configuration, users can show or hide left/right border, enable or disable the section tab.
editable: flag to enable or disable the editable mode. In non-editable mode, the Save template button in the header is removed, tabs can not be removed, dragged, or renamed.
Create widgets from factory functions
In the case of using existing widgets in FlexLayout dashboard, users can create multiple views of a widget, so all tabs are linked. If users want to have the independent widget in each tab, FlexLayout allows users to define the factories to create widgets from the interface.
def slider_factory(label: 'Label of slider', value: 'Initial value'):
    return ipywidgets.FloatSlider(value=float(value), description=label )

factories = {"Slider factory": slider_factory}

dashboard = FlexLayout(widgets, factories=factories)

If the factory function needs parameters, FlexLayout will build an input form to get parameters from the interface. Users can define annotations to have the label of the input form.
Note
FlexLayout will pass all parameters as string, users need to convert the inputs to their appropriate type in the factory function.
FlexLayout interface
FlexLayout interface is composed of three components:
Toolbar: located at bottom of the interface, it contains the button to save the current layout template to disk.
Section tab bar: a bar to hold the section tabs, it is located on top of the toolbar. A FlexLayout dashboard can contain multiple sections.
Section display window: the activated section is shown in this window. Each section is can be composed of multiple widgets.
A typical interface is displayed in the figure below:

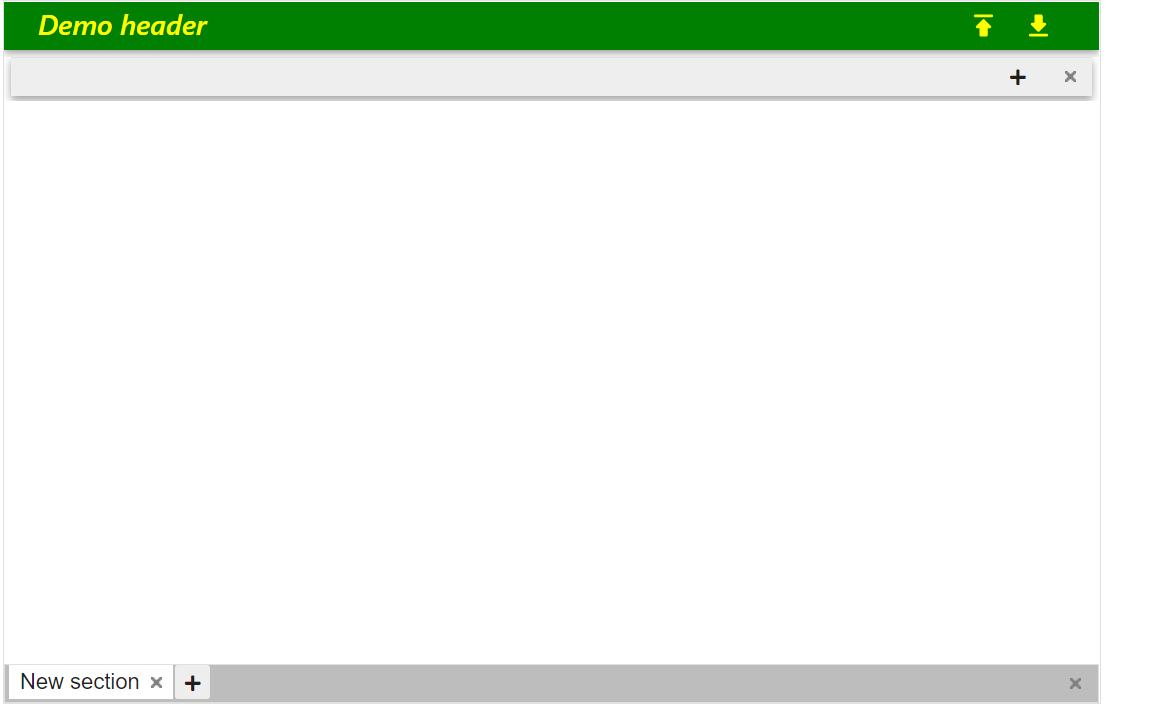
Header
A header can be customized by setting the header parameter of the FlexLayout constructor with a dictionary of three keys.
title: Title of the header
style: CSS styles to be passed to the header HTML element, it accepts any CSS rules but the keys need to be in camelCase format.
buttons: a list of buttons to be shown on the header, users can choose from save, import, export.
Save button: Save the dashboard template to the same folder of the notebook, this feature requires a kernel to handler saving function.
Export button: Export the dashboard template to disk, this feature does not require the kernel, so it can be used in a pure static page.
Import button: Load the dashboard template from a json file, this feature does not require the kernel, so it can be used in a pure static page.
header = dict(title='Demo header',
            style={'background':'green',
                    'color':'yellow',
                    'fontStyle': 'italic'},
            buttons=['import','export']
            )
FlexLayout(header=header)
Toolbar
Save template: save dashboard configuration into a json file in the current working folder. If FlexLayout is started with a template, the current template will be overwritten.
Section tab bar
Uses can use + button to add a new section into the dashboard, a section is displayed as a tab in the section tab bar. Each section can be dragged to modify its position, double-clicked to rename, and removed with the x button.
Section display window
A section is composed of multiple widgets, users can use the add widget button to add the predefined widgets into the section. The added widget will be displayed in the widget tab bar with the name taken from its key in the widget dictionary.
A typical layout of a section with annotation for buttons is shown in the image below:
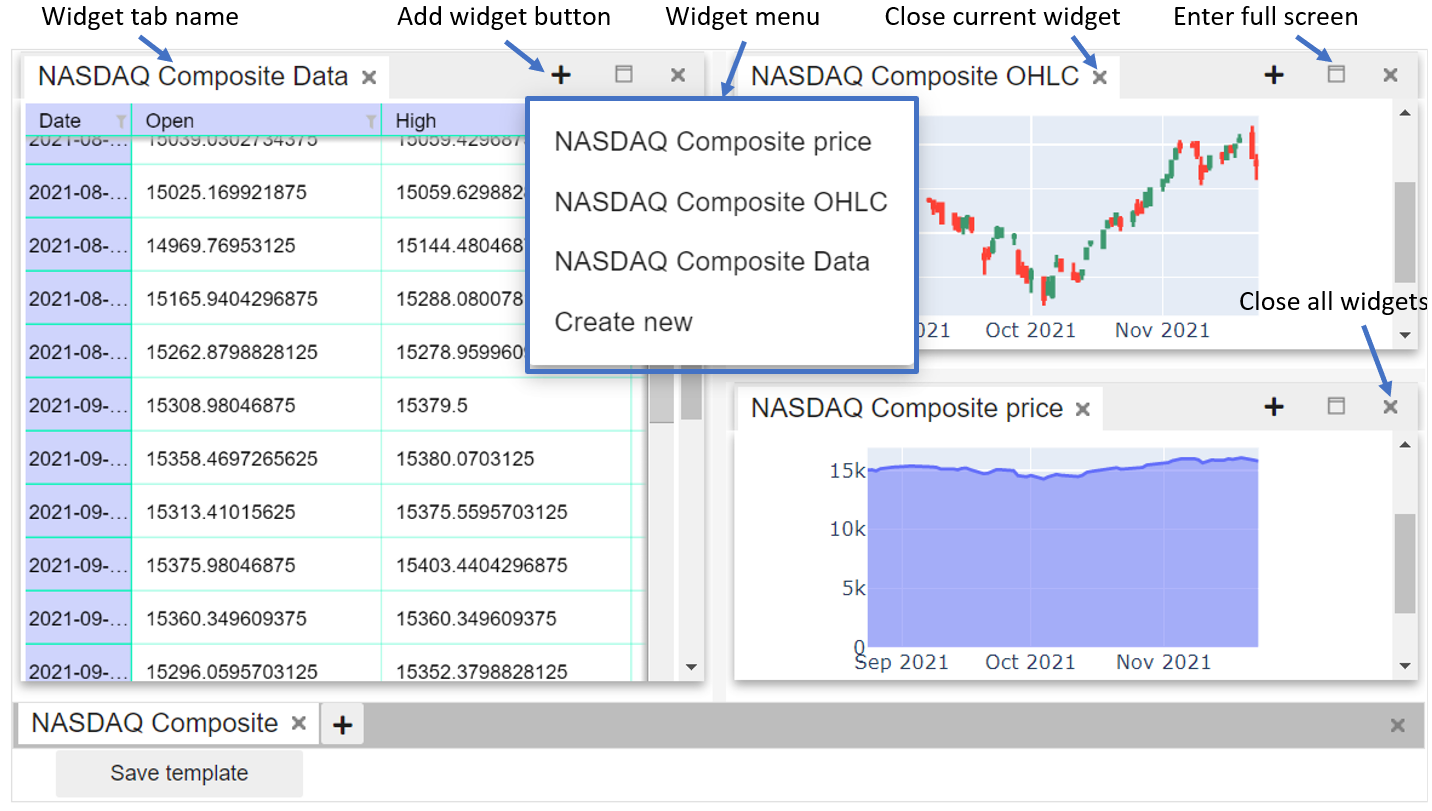
The widget menu can be opened by the add widget button, it contains the keys of the widget dictionary defined in the constructor of FlexLayout. The Create new item in the widget menu is always available, it will be detailed in the next section.
Right-click on any widget will give users options to show or hide the tab bar of this widget.
Users can customize the layout of a section by using drag and drop on each widget. The widgets can also be resized by dragging their borders.
Users can change the name of the widget tab by double-clicking on the tab name.
Create a dashboard layout without widgets
Even without widgets, users can still define a dashboard layout with FlexLayout and then fill the dashboard progressively. To do so, just use the Create new button in the widget menu to add widgets to the dashboard, the placeholder tabs will be created for the new widgets. Once the real widgets are ready, users can update the dashboard with add method:
dashboard = FlexLayout() # Create an empty dashboard
#Add a widget named `foo` to the dashboard by using `Create new` button
#Now add the real widget `foo_widget` to dashboard
dashboard.add('foo', foo_widget)
#The dashboard will be updated with the real widget.
Load and save template programmatically
The template of a FlexLayout dashboard can be save or load from notebook by using save_template and load_template method.
This feature is useful if you want to prepare the widgets and only create the dashboard when a user connected with some specific data about the template.